How-To Guides
Useful step-by-step guides on a wide variety of topics
- Accommodation
- Excursions
- Food
- Group Arrivals
- Noticeboard
- Student Resources
- Teaching
- Observations
- Board Work
- Classroom Seating
- Trinity GESE Exams
- Student Feedback
- Student Academic Management (Teaching Managers)
- Student Academic Management (Teachers)
- Signs
- Open & Close Centre
- Workshops
Accommodation
Room Checks
Rooms checks should be carried out before the arrival of students to ensure bedrooms are ready and fit for purpose
Room checks are typically carried out by the Activity team with supervision from the AM, PM and SWO
Our guests are expecting their bedrooms to be clean, tidy, presentable and without obvious damage (as if they were arriving at a hotel). To this end, we do inspections of all bedrooms. This guide explains how to do so.
Procedure Overview
- Prepare pen & paper or the notes app on your phone
- Collect room keys from PM/AM/SWO
- Enter the block, enter the flat you have the keys for
- Unlock all the bedroom doors
- For each flat: check the kitchen and check each bedroom
- Write and photograph any damage you find, noting the flat/room number each time
- Leave the rooms unlocked (unless your PM/AM/SWO has instructed otherwise)
- Recount the keys in your possession before you leave the building
- Return the keys and give your paper / send your notes to your PM/AM/SWO
Checking for Damage / Cleanliness
A good rule of thumb is that each bedroom should look like what you would want to see when looking for a new place to live
| 📝 CHECKLIST | ⚠️ NEED REPORTING (Note & Photo) |
|
✅ Door lock works
IN THE BATHROOM:
✅ Toilet roll is present ✅ Shower turns on and off ✅ Toilet flushes ✅ Sink tap works/isn't dripping
IN THE KITCHEN:
✅ No awful smells (empty the fridges) ✅ Bins are empty ✅ Floor and surfaces are clean |
❌ Anything you can't check off the checklist ❌ Obvious damage ❌ Missing/broken handles on drawers / wardrobes / doors ❌ Things you wouldn't be happy to see in your own room |
|
🆗 DON'T NEED REPORTING |
|
|
Minor scratches on the wall akin to typical wear and tear |
If you find damage, report it! That way we have a written report and we can't be charged for damage we didn't cause
Problems With Bedrooms
Students are able to report any maintenance/cleanliness issues they have with their bedrooms via their Student Hub.
Staff are encouraged to do the same indicating 'STAFF' as the group leader name. Centre managers (PM/SWO) need to have problems with bedrooms reported electronically in order to communicate these problems efficiently to the host university.
Excursions
Prepare for Excursions
Excursions form a major part of ANGLO programmes. They are intended to be fun and enjoyable but need to have structure and purpose so that they make sense in the context of the programme.
Here we look at preparing for excursions from multiple perspectives.
Preparation Students Receive
As part of their lessons, students learn about the places they will visit in the second lesson of each day. Care is taken to ensure students do these lessons before they go on the related excursion but due to timing and logistics, this isn't always possible.
In these lessons students have the opportunity to share what they already know about the place they'll visit, learn basic information about the place, and also receive an 'excursion challenge', some kind of task they have to try and complete during the excursion. In the equivalent lesson the next day, students feed back to the class on the results of the challenge.
Immediately prior to departure, ANGLO Leaders will brief students on the itinerary for the trip ahead including: transport, timings and safety information (see subsequent sections for more info).
Preparing for the Excursion (as an ANGLO Leader)
- Know the destination. Check the timetable, and ask your AM/PM.
- Check the method of transport with your AM/PM.
- Confirm leaving time, return time, food instructions and entrance instructions.
- You’ll need to know what time you are leaving and what time you are returning to campus. This will help you plan your journey times.
- Full day excursions and some half day excursions involve a packed meal or meal out.
- Some excursions include an entrance to a museum/attraction. The time of the entrance may be very strict so you will need to plan for this.
- You’ll need to know what time you are leaving and what time you are returning to campus. This will help you plan your journey times.
- Grab the itinerary for your excursion from the Activity Hub
- Liaise with your group leader. Normally your AM/PM will pair you with a group. It’s best to talk to the group leader directly to make sure their expectations for the excursion are understood.
- Modify the itinerary as necessary in agreement with the group leader.
- Route planning. If you are using public transport, plan the route you will take, and take note of it. Consult with a teammate or your AM/PM if you have any doubts. If you are travelling by coach, plan the route around the city you will be visiting.
- Weather. It’s a good idea to check the weather the day before your excursion. You might want to change your clothing, and/or remind your group to bring some extra water to drink.
Think: destination, route, communication, food, itinerary, safety, weather
The Activity Hub hosts a wealth of information and resources for all excursions
Preparing Yourself for the Excursion
- Make sure you're confident on the itinerary (ask a colleague or manager if not)
- Have you got a booking reference number if there is an entrance to an attraction?
- Have you got a specific train (or bus) to catch?
- Have you got a water bottle for yourself?
- Have you got appropriate shoes (no sliders/flip-flops) and jacket/raincoat? (Weather dependent)
Before Leaving Campus
- Before you leave campus with your group (regardless of your transport method), make sure you’re ready
- You've done all the steps in Preparing for the Excursion
- You've done all the steps in Preparing Yourself for the Excursion
- You know how many students and group leaders you are accompanying
- Meet your group, introduce yourself to the group leader and group (if you don’t know them already)
- Double check the number of people matches the information you have been given by your PM
- Make sure everybody knows the immediate plan e.g. get on coach number 1, or catch the tube to x station
- Review the Emergency Reaction Plans, in particular:
- Make sure that students know if they are separated from their group on public transport, they must get off the train at the next station and wait (or if they fail to get on the train they should wait on the platform)
👀 TOP TIP: Shout a big hello to get your students’ attention and introduce yourself. You can then ask them to repeat any instructions to check comprehension: e.g. “Where are we getting off the train?”
During Excursions
On the Tube / Train
Before you board the train, make sure everybody knows which station to get off at. When the train arrives for you to get on, get on last, ensuring all students and group leaders are on board.
When trains are busy, it can be difficult to get everybody onto the same carriage - this is why it’s essential everybody knows where to alight. During the journey, chat to the students to build their enthusiasm for the excursion.
When you alight, ensure everybody has got off the train before you. Get off last.
On public transport, our students will be mixing with the general public. It’s important to keep an eye
out as some people can be a little unfriendly towards people speaking other languages.
Getting on: Inform, allow to board, board, count, interact, monitor. Getting off: Inform, allow to alight, alight, count.
On the Coach
Before boarding the coach, check students have their packed meal (if applicable). As students board, remind them to put their seatbelts on. Perform a head count to make sure everybody is present.
As the journey starts, you might like to make an announcement to everybody (with the driver’s permission) to remind them of their destination, not to leave litter on the coach, and the estimated time of arrival.
Check that seatbelts are fastened. Students are not allowed to stand up during the journey.
On arrival, make sure that students have taken all their belongings with them (usually the coach will not remain parked so it can’t be accessed until pickup time), including any rubbish.
On the Public Bus
Before you board the bus, make sure everybody knows which stop to get off at. When the bus arrives for you to get on, get on last, ensuring all students and group leaders are on board.
Encourage students to sit where possible, and if any are standing, remind them to hold on tightly.
When you alight, ensure everybody has got off the train before you. Get off last.
Meeting Points
During excursions, there will be some time when the students are not moving around en masse e.g. inside a museum, at lunchtime etc. This is fine, as long as a clear, well-defined meeting point is established. Be clear about where the meeting point is and the meeting time.
👍 Examples of good meeting points: Next to the fountain in the middle of the square or outside the main entrance to the museum
👎 Examples of bad meeting points: Near the McDonald’s (there are lots of McDonald’s!) or any place the students haven’t already seen
What to do if...
Consult the Emergency Reaction Plans for a list of procedures for different emergency situations
Remember students they have an emergency contact number on their student card (in the plastic wallet of their lanyard), which they can use if necessary.
| Situation | Details | Action to Take |
| A student is late... |
For the coach in the morning | Get everybody else on the coach. Go to the accommodation block to find the student - everybody is waiting for them |
| For the meeting point during the excursion |
|
|
| A student gets lost... |
On public transport | See below: A student fails to get on/off the train with the group |
| During an excursion |
|
|
| A student fails to get on/off the train/tube with the rest of the group |
|
|
| A group leader wants to change the excursion itinerary | During the excursion |
This may happen and it is fine as long as:
If you're in any doubt, contact your AM/PM |
Food
Packed Meal Distribution
Staff and groups get packed meals for some excursions. Everybody gets packed lunches at weekends in most centres, and some groups get packed meals on arrival/departure
Packed meal distribution is usually carried out by the Activity team with supervision from the AM, PM and SWO
Procedure Overview
- Collect a list of groups from your AM/PM/SWO. This will tell you how many meals are required for each group
- Take spare paper and a marker so you can label meals
- Collect trolley/trays of packed meals from the canteen (ensure the total matches what you expect)
- Transport the trolley/trays to the distribution area (ask your AM/PM/SWO if you’re not sure where this is)
- Set aside packed meals for people with special dietary requirements - these should be labelled as such
- Count the paper bags into the right amounts for each group (taking into account the different types of sandwiches - ensure a fairly even distribution). Make sure to set aside packed meals for staff too
- Label each group clearly so when the group leader comes to collect, you know which is the right pile of bags
- Give the group leader their packed meals.⚠️ Don’t give packed meals to unaccompanied students
- Clear up the distribution area of any paper/empty bags etc
All special dietary requirements must be clearly indicated on the groups list. In case of any doubt regarding allergies/intolerances, consult the AM/PM/SWO and liaise with the relevant group leader
The groups list must also include staff as a group - at weekends residential teachers and those on time off may not be present in the canteen to collect their packed lunch in person
The overview above will be different for arrival; likely the AM/PM/SWO will ask for packed meals to be placed in fridges in the students' flats
The overview above will be different for departure; likely the AM/PM/SWO will ask for packed meals to be distributed at the coach pick up point
Dietary Requirement Abbreviations
V = Vegetarian
Vn = Vegan
LF = Lactose free
GF = Gluten free
H = Halal
Meal Duties
Meal Duties are normally carried out by the Activity team with supervision from the AM, PM and SWO
The canteen is one of the busiest locations on campus and requires good organisation and staff presence to ensure the smooth running of mealtimes (breakfast, lunch, and dinner). Staff on meal duty play a vital role in ensuring a positive experience for all students during these times; here's how to carry out your meal duty effectively.
In all canteens, dishes should be clearly labelled so as to easily identify what is in the dish e.g. if it contains meat, or if it is halal/kosher
Students, staff and group leaders are issued with 'allergen cards' so they may easily explain to catering staff what they can/cannot eat (in some campuses, the university provides these cards). These should be carried in the plastic wallet attached to the lanyard
Procedure Overview
Confirm the meal times and the designated dining area(s) with the AM/PM/SWO. Be punctual and ready to assist as students arrive. The duty consists of:
Crowd Control and Queue Management
- Position yourself strategically to help manage the flow of students entering the dining area.
- Encourage students to form orderly queues and move through in a calm and respectful manner.
- Be visible and approachable to address any congestion or minor disruptions.
Tray Clearing Assistance
- Monitor the designated tray disposal areas.
- Encourage students to clear their own trays after finishing their meals and keep an eye out for students leaving their trays on the dining tables.
- Offer gentle reminders and assistance to students who may need help understanding the process.
- Ensure the tray disposal areas remain tidy and organised.
Support for Students with Lower Levels of English
- Be patient and use clear, simple language when communicating with students who have limited English proficiency.
- Utilise visual cues or gestures to explain instructions regarding queueing, tray disposal, or accessing different food options.
- Direct students to another staff member or speak to their GL if you are unable to understand their needs.
Ensuring Proper Eating and Addressing Meal Issues
- Circulate through the dining area to observe if students are eating adequately.
- Be attentive to students who may seem hesitant to eat or are experiencing difficulties with their meal.
- Encourage students to try different foods and ensure they are consuming a balanced meal (for many students this will be their first experience of ‘British’ food and may be resistant or hesitant to try it).
- If a student has a problem with their meal (e.g., it's incorrect or there's an issue with quality or quantity), listen to their concern calmly and seek to resolve the issue with the appropriate catering staff immediately.
Dietary Requirements
- Be aware of students with special dietary requirements, including allergies, intolerances, halal, kosher, and others. Your AM/SWO/PM will provide you with this information.
- Familiarise yourself with how these meals are typically identified or distributed in the canteen.
- If a student with a dietary requirement seems to have received the wrong meal, intervene and ensure they receive the correct one by liaising with the catering staff.
- Be vigilant to prevent cross-contamination if students suffer from allergies or intolerances and require a separate meal (e.g. celiac disease or nut allergies).
- Be mindful that some students may unintentionally select food that does not meet their dietary requirements (e.g., halal students accidentally taking pork products). Observe students, and if you notice a potential issue, discreetly intervene to offer support and help them find a suitable alternative. Alert catering staff if necessary.
Important Considerations
- Maintain a positive and encouraging attitude to create a pleasant dining environment.
- Work collaboratively with the canteen staff and communicate in a polite and professional manner.
- Work collaboratively with other staff members on meal duty to ensure comprehensive coverage of the dining area.
- Be proactive in identifying and addressing potential issues before they escalate.
- If you are unsure about how to handle a situation, don't hesitate to ask a more senior staff member (e.g., your AM/SWO/PM) for guidance.
- Report any significant issues or concerns to your AM/PM after the meal duty.
- Neither you nor the canteen staff are responsible for clearing students’ trays. Ensure students clear up after themselves to allow for other students to sit at the dining tables when they have finished.
AM/PM/SWO Responsibilities
- Clearly communicate the meal duty schedule and locations to all staff members.
- Provide staff with a list of students and their known dietary requirements where necessary.
- Inform staff about the process for identifying and distributing special dietary meals.
- Brief staff on any specific instructions or concerns related to mealtimes.
- Ensure there is adequate staff coverage for each meal duty period (allocate each staff member a specific area/role within the canteen).
Group Arrivals
Check-In
Welcoming and checking groups of students into their rooms is an important start to their stay
We’ll guide you through the welcome and check in process to make sure groups are treated fairly and receive the service they expect. (Note that depending on circumstances - e.g. a late flight - your PM/AM may give you instructions that supersede this guide.) First impressions are crucial!
Procedure Overview
- Track the group's flight from landing time. Managers inform the team when the group leaves the airport in order to calculate their ETA to campus
- Be ready to greet the groups at the coach drop off point to introduce yourselves to the students and group leaders
- Assist with unloading luggage
- Check the coach interior for dropped/forgotten items (phones, documents, bags etc) and for cleanliness
- Move groups to the front door of their accommodation building
- Give a speech to the whole group: Welcome to the centre, the name of the building. Explain that students must wear their lanyards at all times, that emergency number is on the student card
- Explain the student card to the students:
★ Emergency Reaction Plans are written out (explain what to do if they hear the fire alarm)
★ The rules (highlight ‘no bullying’ and ‘listen to instructions carefully’
★ The emergency phone numbers are written on their card already - Ask students to complete the following information when they get to their bedroom:
★ Their Hall name (name of their building), their Group Leader name, room number and phone number
★ Any other missing information, they should ask their group leader, or their teacher on their first day of class (the next day)
- Explain the student card to the students:
- Explain fire safety and evacuation procedures (these are written on notices in the entrance and in the corridors of the building). Ensure you mention: evacuate calmly if you hear the fire alarm, the meeting point indicated.
Please ensure you have gone over all the rules mentioned above before distributing keys - this will ensure you have everyone’s full attention
- Explain with a visual demonstration how to use the keys you are about to give them
- Distribute keys in agreement with the group leader (the leader will usually have a prepared list of
names and rooms. If in doubt, consult your Programme Manager) - Bring students into the building in flat groups. In the event of needing to use lifts for luggage: bags go in the lift, students go via the stairs (where possible)
- Ensure students are able to open their doors, find light switches, and know they must have their key on their lanyard around their neck whenever they leave their room
- Show at least one student the communal kitchen - drinking water is available here
- Arrange next meeting point/time with group leader (either for first meal or campus tour)
Checklist for Check-In
Make sure groups are able to access their rooms, and give them information about what to do next
| 📃 CHECK-IN CHECKLIST |
| ✅ Team is ready to meet coach(es) at coach drop off point ✅ Welcome the group and assist with luggage / check coach is empty of personal items ✅ Explain how lanyards and keys work outside accommodation block ✅ Explain fire procedure, no bullying rules, complete missing information on student card ✅ Distribute keys/lanyards/student cards ✅ Ensure students can all enter their bedrooms ✅ Point out kitchen/communal area and access to drinking water ✅ Ensure group leader knows when/where next meeting point is |
Most universities have green labels denoting drinking water. Rule of thumb is bedroom taps are not great quality, kitchen taps offer drinking water. Check with the accommodation office.
Campus Tours
All groups need an orientation shortly after arrival to ensure students and Group Leaders can navigate around the key sites on campus
Campus Tours are usually lead by the Activity team with supervision from the AM, PM and SWO
Imagine you’ve just arrived at a university you’ve never been to before. You’d appreciate someone showing you around, right? Well, the same goes for our groups. The exact order of the campus tour you give will depend on the university you are based at, so the Activity Manager and Programme Manager will help you design the tour. This guide gives you the main outline of how to organise a campus tour.
Procedure Overview
- Meet the group at accommodation to begin the tour
- Ensure the group are all wearing their lanyards, have their room keys/card, and know about their student card inside the plastic wallet on their lanyard (their student card gives them essential information about where they are staying)
- Inform students they are about to embark on their campus tour. Remind them that they can access a map and campus information on the Student Hub for their centre
- Lead the campus tour, explaining necessary information clearly and carefully. Ask meaning check questions* to ensure comprehension
- Point out fire assembly points for accommodation, canteen and classroom buildings
- Finish the tour by accompanying the group to an appropriate location (ask your line manager where), which could be: accommodation, the canteen, or an evening activity location (depending on the time of day)
Meaning check questions = For example: “Dinner starts at 6 o’clock so you must be punctual” “What time does dinner start?”
Checklist for Campus Tours
| 📃 CAMPUS TOUR VISIT CHECKLIST 📌 |
|
Students and Group Leaders must visit:
|
| 📃 CAMPUS TOUR SAFETY CHECKLIST 🦺 |
|
Student and Group Leaders must learn about:
✅ Fire safety information and where to find it (in the entrance to their accommodation) ✅ Emergency Reaction Plans (on Student Hubs, in Group Leader Welcome Packs and in the entrance to accommodation) ✅ Road Safety information (on Student Hubs and in the entrance to accommodation) |
Welcome Presentations
Welcome Presentations are held en masse, on each arrival day. They serve as a welcome to all the students, in which students will learn key information about the ANGLO centre they are staying at, the names of the staff, and vital safety information. These presentations are made by ANGLO and can be accessed by managers.
Procedure Overview
Presentations are held in lecture theatres or similar large rooms, where there is enough space for all students to be seated and see the screen where the Welcome Presentation is being displayed.
In addition to the ANGLO Welcome Presentation, it is customary for staff members who are on duty to be present to introduce themselves.
Usually the PM leads the presentation but other managers can also do so.
Welcome Presentations must be held the same day that students arrive, or, in the case of late arrivals, the following morning
Topics to Cover
The ANGLO Welcome Presentation covers the following topics which must be highlighted by the person/people leading the presentations:
- Welcome to the centre
- Name, contact information of the management team:
- PM, AM, SWO, DSP (Designated Safeguarding Person), TM, WTS
- Introduction of the ANGLO Leaders and their role
- Introduction of Teachers and their role
- Campus Rules
- Emergency Reaction Plans
- Who to talk to in case of problems and the photo and details of ANGLO's DSL (Designated Safeguarding Lead)
- Student Hub information and access instructions
Noticeboard
Build a Noticeboard
Use a Noticeboard
Student Resources
List of Student Resources
All students on ANGLO courses receive the following on or shortly after arrival:
- 1 x ANGLO student card
- 1 x ANGLO lanyard
- 1 x ANGLO notebook
- 1 x ANGLO pen
- Access to the Student Hub
ANGLO Student Card
ANGLO Lanyard
ANGLO Notebook
ANGLO Pen
Check out the Welcome Packs guide for more information on how to prepare and distribute student resources
Welcome Packs
When groups arrive, group leaders need an information pack, and students need to be able to be identified. To achieve this, we prepare a Welcome Pack
The Activity team is usually tasked with preparing Welcome Packs, overseen by the PM/SWO
Group Leader Welcome Pack Contents
- Copy of the programme (print from Centre Info)
- Welcome letter (found in shared drive > 03 Centre Team > Welcome Pack)
- Campus map (paper copies available, digital version on Student Hub)
- List of A and B groups (template found in shared drive > 03 Centre Team > Welcome Pack)
- QR code and web address for Student Hub (shared drive > 03 Centre Team > Welcome Pack)
- Master key for their students’ bedrooms/flats (where possible, depends on each university)
Note that only Managers have access to the shared drives
Group Leader Kit Contents
Group Leaders should also receive a lanyard, plastic wallet with their completed ID badge inside.
Student Kit Contents
All students must be given:
- ANGLO Lanyard
Attached to the lanyard:- ➢ Plastic wallet
- ■ Completed Student card* (complete by Activity Team):
- ★ Centre Emergency number (found on Student Hub)
- ★ Campus Security number (found on Student Hub)
- ★ ANGLO 24/7 Safeguarding number (+44 7741 575 158)
- ★ Programme Manager’s name
- ★ Teaching Manager’s name
- ★ Activity Manager/DSP’s name
- ★ Centre Address incl. postcode (found on Student Hub)
- ★ Hall/Block name (if possible)
- ★ Group Leader’s name (if possible)
- ★ Centre Emergency number (found on Student Hub)
- ■ (Optionally, use red and green highlighters to indicate group A and group B)
- ■ Completed Student card* (complete by Activity Team):
- ➢ Bedroom key(s)/keycard
- ➢ Plastic wallet
Students must be shown their student card during check in, in order for them to understand what information is on it, and therefore where to find essential contact information. (Students also receive a visual explanation of the card during the Welcome Presentation)
Teaching
Observations
Teachers usually have two lesson observations: Drop-in observation and Full observations.
Drop-in Observations
Drop-in observations are informal lesson observations. They last around 15 minutes and are held at the earliest opportunity in order to identify any potential issues with teaching or classrooms. Drop-in observations take place whenever the TM deems them necessary but the TM tells teachers in advance.
After a drop-in observation the TM may direct teachers to the Teacher Knowledge Bank if further support is required.
Full Observations
Procedure
-
TM Produces a Lesson Observation Rota at least 3 days before the first full observation and makes it available to the all teaching staff.
-
TM Organises an individual pre-observation meeting to briefly discuss the observation checklist. Teachers can suggest areas of their teaching on which they would like specific feedback.
-
Teachers hand in or email their lesson plan for the observed lesson before the observation starts.
-
TM writes up the observation feedback report.
-
TM follows up the observation with a brief discussion with the teacher within two working days from the observation, then completes and emails a final Teacher Observation Report to teacher and HO within 5 working days.
Observation Lesson Plan
Teachers need to complete a Lesson Plan form and hand it to the TM before a full observation.
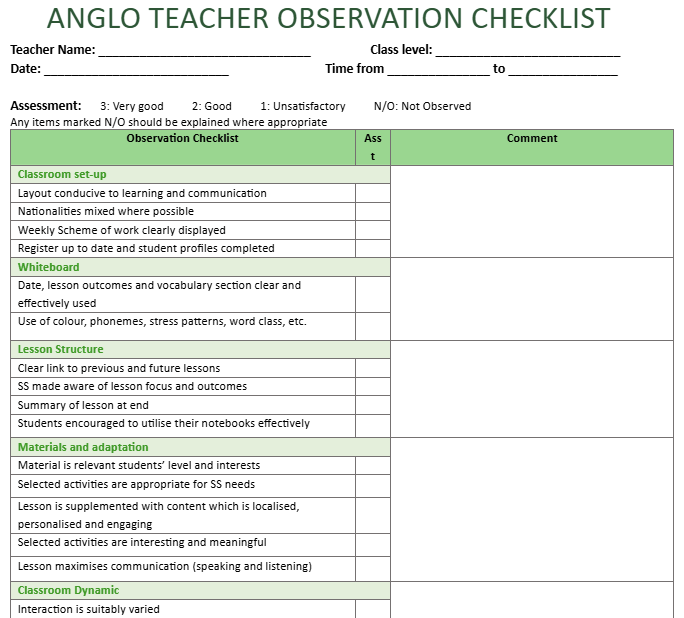
Observation Checklist
An ANGLO Teacher Observation Checklist must be completed by the TM for each full observation, then handed in to the teachers to keep. ANGLO will keep a copy.
Assessment: 3: Very good, 2: Good, 1: Unsatisfactory, N/O: Not Observed
*Any items marked Not Observed should be explained where appropriate
Board Work
Teachers must make sure there board work is always tidy and useful for the students.
Essentials of board work:
-
Lesson outcomes: what will students have learned or improved by the end of your lesson?
Teachers should explain these to their students at the beginning of the lesson, refer to them during the class then review/reflect at the end of the lesson. Learning outcomes for each lesson are listed on the first slide.
-
Language models: clear examples of functional language, with important language elements/patterns highlighted
-
New vocabulary: with parts of speech (n, v, adj, etc.), and highlighted pronunciation (stress, important phonemes)
-
Error correction
We recommend dividing the board into clear sections, and using colours consistently throughout the course. For example: black or blue for main text, green for highlighting important language elements or patterns, and red for error correction. See below board plan:

There's more info on Board Work on the Teaching Hub's Teacher's Knowledge Bank
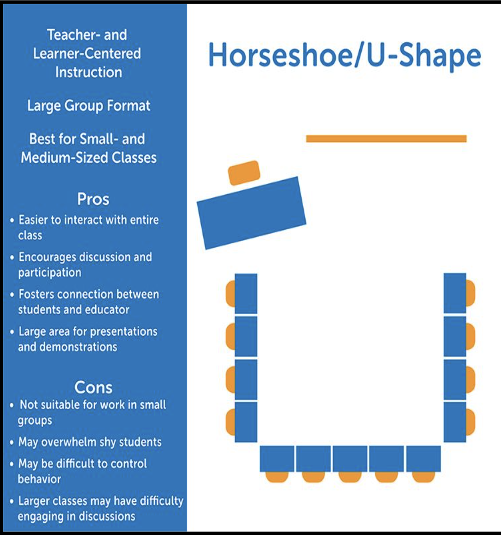
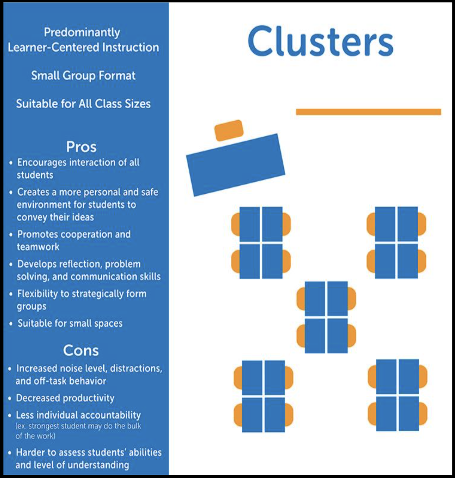
Classroom Seating
In order to create the most effective learning environment for students it is important to consider seating arrangements in the classroom. Below are two possible classroom seating layouts and the types of teaching activity they work best with:
Trinity GESE Exams
Some ANGLO students opt to sit their spoken Trinity exams during their ANGLO programme.
Teachers typically have little interaction in this process (it is handled principally by the management team).
The Trinity Exam Process is detailed on the Teaching Hub
Student Feedback
ANGLO collects student feedback on Programme Day 3 and at the end of the course (Course Day 7 for 13-night programmes, Course Day 8 for 14-night programmes). Day 3 feedback is used to see how students are settling in and to identify any problems they might so that these can be resolved as soon as possible.
End of Course feedback is used to assess satisfaction throughout the programme and the results are used to make changes (where necessary and appropriate) for subsequent student intakes.
Student feedback forms are completed in the classroom with the teacher helping students to locate the form and assisting with any comprehension difficulties.
Procedure for Collecting Student Feedback
- On a feedback day, teachers should bring QR code posters to their classroom (these are available in the Teaching Office from the Teaching Manager)
- Teachers ask students to scan the QR codes on students' own devices
- Students complete the form individually and submit their answers
Students need to complete their own form on their own device. This is important so that every student has the opportunity to give feedback
Student Academic Management (Teaching Managers)
Attendance, Evaluation & Reports Guide
Teaching Managers: Managing attendance and evaluation of students
ANGLO uses the name SAM for the documents that are used for Student Academic Management
The Student Academic Management (SAM) Google Sheet document brings together attendance, class profile, class records, progress checking and report generation to one place.
This guide explains how to use the SAM from an administrator’s perspective. TMs and WTS can interact with more parts of the SAM than teachers can.
To understand how your teachers need to complete the attendance, profile and evaluation information, please refer to the Student Academic Management Guide for Teachers.
🔎 Overview of the SAM document
There is a SAM Google Sheet for each group A and group B in each turn. These SAM documents are already in your Academic Shared Drive > Academic > Turn 1 (or Turn 2, 3, 4).
You can easily identify these documents from the title of the document, for example:🔴 Group A Turn 1 SAM
Or🟢 Group B Turn 2 SAM
Each of these documents has permissions so that everyone can edit it
Naturally, there are controls in place to make sure users don’t edit areas they shouldn’t.
🔀 Flow of the SAM document
- Set Up: Assigning Teachers to Groups
- Class Lists: Generating class lists
- Daily Use: Recording attendance & evaluating students
- Reports: Generating reports for each student
🤹🏽♂️ Set Up: Assigning Teachers to Groups
When you first open a SAM document you will land on the ‘⚙️ DASH’ sheet. Here is where you will see the various classes at your centre - each one denoted by a name - and the course level of each one:

In the example above, there are 3 concurrent classes.
Now you need to assign teachers to teach each class by entering their name in the relevant group's row in the Teacher column. You also need to enter the classroom assigned to that teacher.
The Number of Students, the Course Level and Age Range of each group are also shown to facilitate assigning the most appropriate teacher to the group.
That’s the end of the setup!
If you visit any of the class sheets at the bottom of the document e.g. ‘Bath’, you will see the teacher’s name and class level just as you assigned them on the ‘⚙️ DASH’.
The only thing that remains is to make sure your teachers have the link to the SAM document. You can send this via email or WhatsApp
Remind teachers that they will need to pay attention as they will have two parallel SAM documents; one for group A and one for group B.
Remind teachers to follow the information detailed in "Student Academic Management (Teachers)" which is linked on the Teaching Hub.
📃 Class Lists: Generating class lists for distribution
Once the setup is complete, and each group has been assigned a teacher and a classroom, the SAM can be used to generate a printable Class List for each class:
A PDF is created for each class. These can be printed and stuck on a noticeboard or wall, or shared digitally with Group Leaders. This is essential for students and group leaders to know where they must be for their classes.
To generate the class lists:
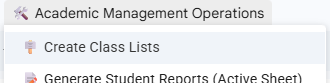
- Click Academic Management Operations > Create Class Lists at the top of the document

(If this is the first time you are using the menu, you will need to authorise the script) - A popup message will confirm the classes that a class list will be created for. It also informs you that the generated Class Lists will be stored in Google Drive and also emailed to you. If you are happy, press Yes to continue
- DO NOT PRESS ANYTHING ELSE. You will see a notification in the bottom right hand corner of the screen indicating progress
- When the operation finishes you will see a success message
- You can find the Class Lists in your email inbox as well as in your Academic shared drive
🗓️ Daily Use: Recording attendance & evaluating students
Once the course begins and students are in the classrooms with their teachers, the regular daily use of the SAM document begins.
Teachers must record attendance, complete class profile, complete class records, and evaluate students. It is best to refer to Student Academic Management (Teachers) for further details.
📝 Reports: Generating reports for each student
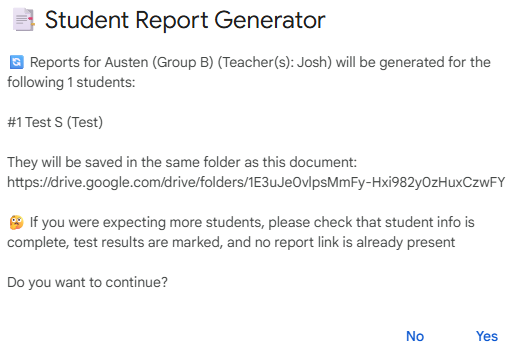
Towards the end of each course, when all the attendance and evaluation* has been entered by the respective teachers, you are ready to generate reports for each class.
*For reports to be correctly generated, all basic student info (First Name, Last Name, Group, Nationality, ID) and Day 4 and Day 8 evaluation results must be entered
You need to generate reports class by class:
- Make sure the sheet for the class you want to generate reports for is active (click it to make it active)
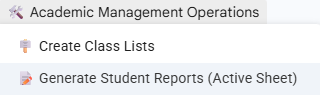
(the blue colour means it’s active) - Click the Academic Management Operations button at the top of the screen and select Generate Student Reports (Active Sheet):

(If this is the first time you are using the menu, you will need to authorise the script)
The system will do some checks to make sure that everything looks right. If there is something wrong, you will be informed by an error popup notice. Follow the instructions given in the popup message. If you are not able to, reach out to Chris. - Assuming there are no error popups, you will be greeted by a confirmation message. It’s important to read this message carefully!

The folder location will be shown to you again at the end of the process. In any case the reports will be in the same location as the SAM, in Student Reports > Group B Reports (or A) > Austen (or other group name) -
If you are not happy and want to edit student information in the sheet, click ‘No’. Otherwise, click ‘Yes’.
⚠️ Once you have clicked "Yes", DO NOT CLICK anything else. Wait until you see a success message. -
You can copy the folder link and then paste it into another browser tab to see the reports.

ℹ️ Each student's generated individual PDF report will be linked in the rightmost column for future reference
Inside the folder, each report has the name of the student, with the first letter of their surname and their group name as the file title
You should check all generated reports.
Liaise with the Programme Manager to arrange sending them to the group leader.

🔀 Moving a Student from one group to another
Carefully follow these steps:
➡️ If the course hasn’t started yet:
- Select the student’s information in columns B to I of the group sheet and press ‘Ctrl + C’ to copy (or click the ‘Edit’ button at the top, then click ‘Copy’)
- Navigate to the new group’s sheet
- Select the cell in column B where there is the first empty row and on your keyboard press, ‘Ctrl + Shift + V’ (or click the ‘Edit’ button at the top, then click ‘Paste without formatting’)
- Go back to the old group, select the student’s information in columns B to H, then press backspace on your keyboard to remove the student (since no attendance or profile data has been entered for this student, it is safe to delete them)
- If there are other students below the empty row and you wish to remove the empty row, select all their data with your mouse, then press ‘Ctrl + C’ to copy (or click the ‘Edit’ button at the top, then click ‘Copy’)
- Press backspace on your keyboard to delete the selected students
- Select the cell in column B where there is the first empty row and on your keyboard press, ‘Ctrl + Shift + V’ (or click the ‘Edit’ button at the top, then click ‘Paste without formatting’)
➡️ If the course has already started (meaning that some attendance for the student has been recorded):
- In the old group’s sheet, select the student’s information and any attendance, and press ‘Ctrl + C’ to copy it (don’t delete it!)
- Move to the new group’s sheet, and select the cell in column B where the first empty row is (i.e. after the last student) and press ‘Ctrl + Shift + V’ (or click the ‘Edit’ button at the top, then click ‘Paste without formatting’)
- Repeat steps 1 and 2, except this time copying the student’s Class Profile information from the old group to the new group (if it was filled out)
- IMPORTANT: Return to the old group’s sheet and modify the student’s departure date to the new departure date (i.e. the date on which the student left the class). The easiest way to do this is to double click the cell, and select a date from the picker
- IMPORTANT: Now select the student’s Nationality, Age and Level. Press backspace to delete them. You can now see the departed student’s row has turned red, indicating to the teacher that the student is no longer in the class. They are also not counted among the total number of students
🆘 Help! (FAQs)
Q: What happens when you click the 'Academic Management Operations' button for the first time?
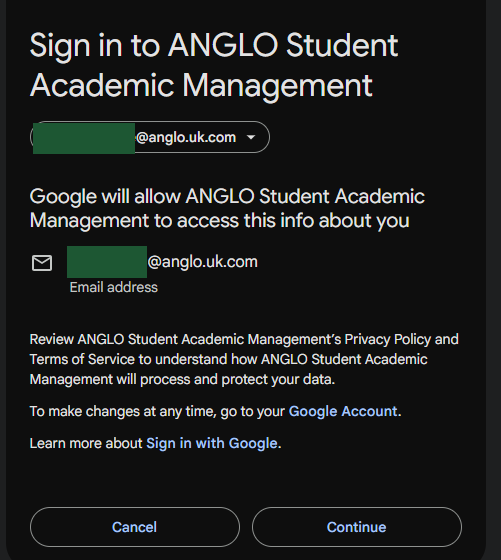
IMPORTANT: The first time you press this button and Create Class Lists or Generate Student Reports you will need to to give authorisation for the script to allow access to Sheets and Drive. This is safe to do. Authorise the script by following the instructions on screen.
When you see the message:

Click OK to move on.
Click Continue (after making sure the account you are logged into is your ANGLO Google Workspace account):
Select all to give the script the necessary permissions:

Press Continue and the popup window will disappear.
You now need to go back and click the Academic Management Operations button again to perform the process you wanted.
Q: I have generated some reports and I’ve discovered there’s some missing information that I would like to add (or information I would like to change). How do I go about regenerating the reports?
A: If you discover any mistakes, correct them in the class sheet. Then delete the Report link in the rightmost column for the student(s) you would like to regenerate reports for. Finally, run the Generate Student Reports again via the button at the top. (Pro tip: You may wish to move or rename the old PDF reports in Google Drive first)
Student Academic Management (Teachers)
Attendance, Evaluation & Reports Guide
Teachers: Filling in attendance and evaluating your students
ANGLO uses the name SAM for the documents that are used for Student Academic Management
This guide explains how to use the ‘Student Academic Management’ (SAM) Google Sheet, a link to which your Teaching Manager will send you. This document is used to record your students’ attendance, evaluation, and class profile in one single place.
🔎 Overview of the SAM document
Your Teaching Manager will send you a link to a SAM Google Sheet for each course you will teach: one document for group A and one document for group B for each student intake. You can easily identify this information from the title of the document, for example:🔴 Group A Turn 1 SAM
Or🟢 Group B Turn 2 SAM
⚙️ DASH
When you open the document, you should see the ‘⚙️ DASH’ sheet. Click to view it.
Here you will see the names of the various classes, the level of course material the class will follow, and the name of the teacher assigned to each class. You will also see a classroom assignment* and a link to this document should you need to read it again.
*It is possible that classrooms have not been assigned when you first receive the link to the document. Consult your Manager.
In the example above there are groups: each one has a level, a teacher, a classroom, number of students and the age range of the students.
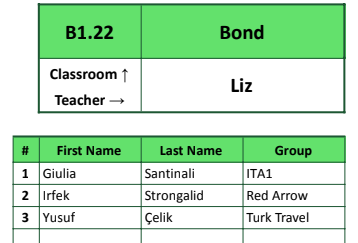
Class Sheet: Class Info
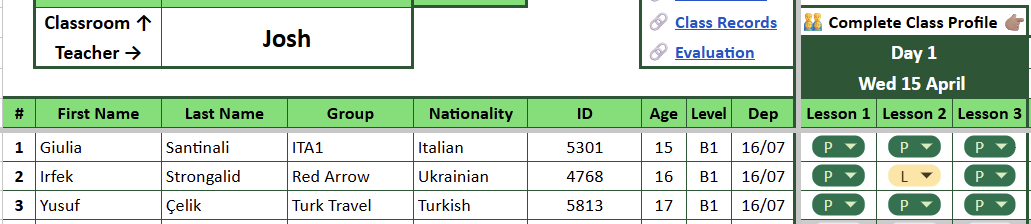
You can easily identify the name of the group assigned to you. Locate your sheet at the bottom of the document. It will have the group’s name on it (in this example we are using Josh who is teaching Austen group). Click to select it:

You'll find the main information about the class in the top left:
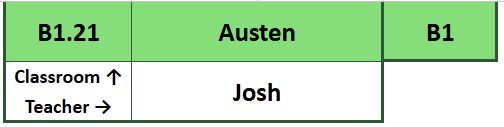
Here you can see confirmation of the classroom (B1.21), group name (Austen), level (B1), group B (the green colour), and the teacher (Josh).
Class Sheet: Student Info
Your students are located in rows 7 to 26 (depending on the number of students in your class*)
*The maximum number of students is 15 (there is space in the register for 20. This is in case students are moved from one class to another. More on this below)
For each student in your class you have their full name, group/group leader name, nationality, ID, age, level and departure date.

Since the Student Academic Management document covers 4 aspects of student management, convenient links are also placed in a prominent location. Simply hover, and click the link to be taken to the part of the sheet you are looking for.

We'll delve into more detail on each of these 4 items in the next sections.
🙋♂️ Attendance
ℹ️ Click on the ‘🔗 Attendance’ to jump across to the 🙋♂️ Attendance section.
Alternative, scrolling to the right, the first section next to your students' names is the Attendance section.
For each day of the course you need to complete the attendance for each of the 3 lessons.
Fill in the attendance for each learning session with a 'P' for present, a 'L' for late or an 'A' for absent. Inform your TM 10 minutes into class if you have any absent students.

Inform your TM 10 minutes after the class begins if you have any absent students
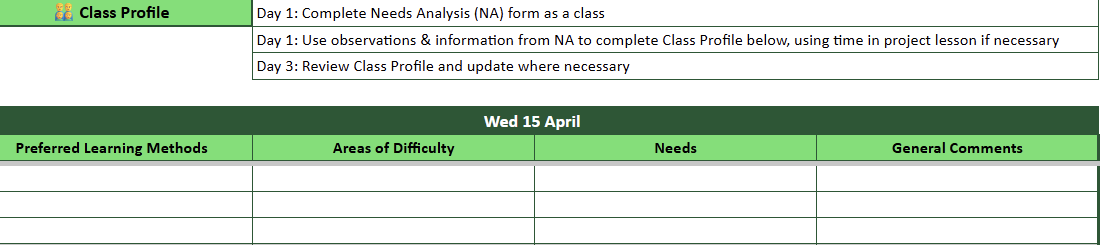
Each day is marked with the date, and any other tasks to be completed on that day. In the example below, today is Wednesday 15th April and the attendance for that day needs to be taken, as well as completing the Class Profile.
👨👨👦👦 Class Profile
ℹ️ Click on the ‘🔗 Class Profile’ to jump across to the 👨👨👦👦 Class Profile section.
The Class Profile needs to be completed on Day 1, using the Needs Analysis and your own observations. It needs to be reviewed on Day 3 (and changed if necessary).
📝 Class Records
ℹ️ Click on the ‘🔗 Class Records’ to jump across to the 📝 Class Records section.
At the end of the 3rd lesson each day, fill in the Class Records (rows 29-32) with information about what you have covered in class.
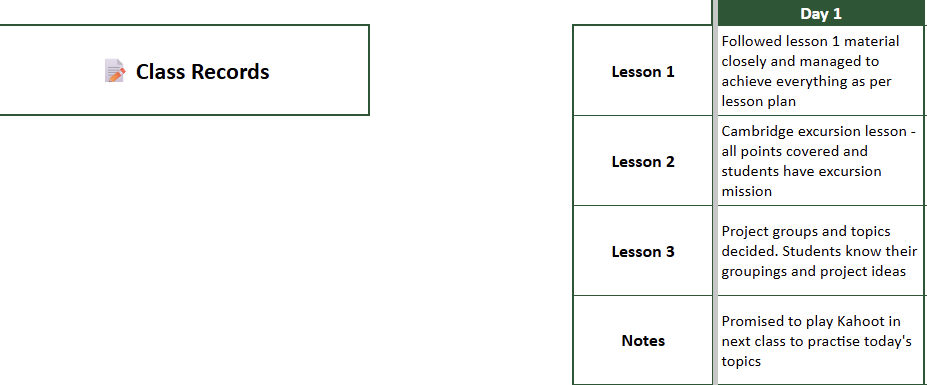
Class Records are a great reminder for yourself and are really beneficial if another teacher has to cover your class
📋 Evaluation
ℹ️ Click on the ‘🔗 Evaluation’ to jump across to the 📋 Evaluation section.
On day 4 and day 8, complete the progress report for your class.
Enter the test result out of 10, then assign Excellent, Good or Needs Improvement for each of the areas indicated. Finally, leave your comments.
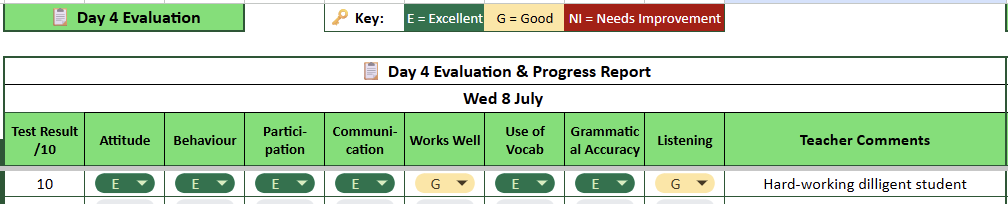
The image above shows the Day 4 Evaluation section but the Day 8 one is identical.
The cell space for leaving comments is really small. TIP: Select the comments cell with your mouse, then type in the formula bar towards the top of the screen.
📜 Certificate Grades
On Day 5 the SAM will indicate to you that it's time to indicate students' certificate grades
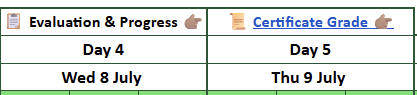
Click the Certificate Grade link or scroll to the right side of the SAM.
Enter P (Pass), M (Merit), D (Distinction) for each student.
TIP: When a Certificate Grade cell is selected, press Return on your keyboard. You can then use the arrow keys to select P, M or D. Press Return again to make the selection and automatically move to the cell (student) below,
🆘 Help! (FAQs)
Q: Do I need a Google account to use this system?
A: Nope! You just need a web browser and the link to a SAM document. However, it is perhaps more convenient for you if you are logged into a Google account, as you can save the link in My Drive for easier access.
Q: Why are some of the rows in my student list grey?
A: If the rows are grey like this:
It means there are no students in those rows, so you don’t need to fill anything in. Alternatively, it means the student isn’t expected to be present i.e. they have departed or have been moved into a different group.
Q: Why is there a student with red text? Why are there red rows?
A: If the rows are red like this:

Then information about the student is not complete. Ask your TM to check your SAM sheet.
Q: Why do some of my students have different departure dates?
A: Some students may leave earlier than others (usually by only one day). Alternatively, the student has been moved to another group. In that case, you will see the Teaching Manager has changed the departure date to indicate the student is no longer in your group, and so you don’t need to mark attendance or do evaluation for that student.
Pay attention to students' departure dates as you may be asked to complete evaluation or certificate grades by your TM earlier than indicated on the SAM
Signs
Signs
ANGLO makes many signs available for each centre. Since the university campuses we use can be large and intimidating at first, signposting information that is relevant to ANGLO staff, students and group leaders is vital. All signs are laminated to ensure durability and so they can be written on with board markers.
We categorise types of sign accordingly:
Noticeboard Signs
These signs are typically A4 and A5 in size and are designed specifically for use on the Programme Noticeboard
They include the days of the week, meals, all types of activity, excursions and more.
Campus Navigation Signs
These signs are typically A3 and A4 in size and are designed to be displayed around campus to aid with navigation. Some of these signs are to be placed on the door of relevant buildings, others are arrows pointing towards said buildings.
There are signs for (not an exhaustive list): Accommodation, Canteen, toilets, coaches, 'Reserved for ANGLO', Offices, Classrooms, Workshops
Safety Signs
These signs specifically relate to safety and include: Emergency Reactions Plans poster, Fire Procedures, Campus Attitude
Office Signs
These signs are for use in or around the Course Office and Teaching Office. They are either for staff use or serve as examples for staff of information that students receive.
Examples of these signs include: Absent Student Policy, Code of Conduct, Complaints Procedure, DSL Poster, Emergency Reaction Plans, Sexual Harassment Poster, Employers' Liability Insurance, Health & Safety in the Workplace.
Signs can be affixed with blu-tak, cable ties or in display cases
Be sure to affix signs in such a way that they do not obscure university logos, signs, notices
Affix signs in a way that is appropriate for the location: e.g. blu-tak is not appropriate for signs displayed outside. Equally, do not use blu-tak on walls where it may damage the paint
ANGLO provides each centre with cable ties, blu-tak, magic whiteboard roll, as well as all the signs grouped by type
Open & Close Centre
Set Up Centre
Before the first groups of students arrive for the first student programme, the university campus where the ANGLO centre is based will be empty!
In this guide we explore the steps to take to get an ANGLO centre up and running and ready to deliver the programme.
Setup Tasks
- Set up ANGLO Course Office
- Set up ANGLO Teaching Office
- Put up ANGLO signage around the campus
Set Up Course Office
- Set up desks, tables and chairs
- Set up printer
- Attach office posters/signs to walls
- Organise sports equipment
- Organise student resources
- Prepare whiteboards with key information
Set Up Teaching Office
- Set up desks, tables and chairs
- Set up printer
- Attach office posters/signs to walls
- Organise student resources
- Organise teacher boxes
- Prepare whiteboards with key information
Put Up Signage
Please refer to the Signs guide
Close Centre
Workshops
Prepare for Workshops
This page provides an overview of ANGLO Workshops. For guidance and materials on leading Workshops, see here.
What are ANGLO Workshops?
Check out our video:
ANGLO Workshops are a type of session that all students do in all ANGLO centres. For 13 and 14-night programmes, students do two Workshops. The Workshops are the same across all centres. Each Workshop takes place in a 4-hour session, usually in the morning.
Workshops are designed to allow students to practise their spoken English in a natural way, outside the classroom, and to use their creativity to make and present something at the end of the Workshop session.
ANGLO Workshops change each year so that students and staff who do more than one ANGLO programme don't repeat the materials and have a unique experience each time.
Where do Workshops take place?
Workshops take place on campus. They start in a classroom/lecture theatre for the introduction and planning stages. Then students are usually required to move around the campus to gather information or create their presentation. At the end of the session students come back to the classroom/lecture theatre to present their creation.
Who leads Workshops?
ANGLO Workshops are lead by ANGLO Leaders under the supervision of the Workshop & Teaching Supervisor (WTS) (or Teaching Manager (TM) in the event that the centre does not have a WTS).
Each ANGLO Leader is responsible for a group of up to 15 students who have a similar level of English.
ANGLO Workshops in 2026
Filmmaking: Short Film Lab - Students work in groups to choose a topic, plan, shoot, edit and present the short film to their classmates
Our Campus: People & Places - Students work in groups to choose an aspect of their campus, carry out a piece of research and present their findings to their classmates
Lead Workshops
Before a Workshop
The materials for each Workshop are found on the Activity Hub. Materials exist in two parts: presentation (to be shown to the students) and notes (a guide for ANGLO Leaders to follow). It's important to familiarise yourself with the Workshop material before you begin the session
The WTS holds a meeting with the ALs to go over the Workshop materials and discuss the logistics of the session.
The WTS assigns each AL a group of students based on the students' class: max. 15 students of a similar English level and a similar age.
The WTS gives a student list and the classroom number to each AL.
Each AL leads a group of maximum 15 students, but it is possible for 2 groups of students (each with an AL) to be assigned to the same classroom if it is necessary for logistical reasons. These groups must have a similar level of English and be of a similar age
The WTS goes over the timings of each stage of the Workshop and is available to help ALs with any questions they may have.
Workshop Meeting Point
Since Workshops only take place twice for each student in their programme, it is unlikely that students can be told which classroom/theatre they need to go to, therefore the WTS communicates a meeting point to the Group Leaders where all the students gather to be accompanied to their respective classroom by their respective AL.
ALs have their student lists and can gather their students and proceed to the appropriate room to begin the Workshop.
Beginning a Workshop
The AL takes the attendance list and any missing students are reported immediately to the WTS.
The AL begins the session by introducing themself and the Workshop to the students, following the guide in the Workshop materials or as modified in the pre-Workshop meeting.
Throughout Workshops
Some things to bear in mind throughout Workshops are:
- Before any break or mission around the campus remind students about road safety
- Before breaks, be clear about what time to return to the Workshop session
- Take the attendance list any time students return from a break or a mission around the campus
- Contact the WTS if you need any support or to report student absences